Top 13 Ukulele Chords
(A Beginner's Guide To Ukulele Chords)If you’re new to ukulele and are wondering where to start, then you can begin with these easy chords! On this page we’ve chosen to break down the top 13 ukulele chords. By learning these basic chords you’ll be able to play many awesome songs on your ukulele in no time.
TIP: Try to play on the fingertips as much as possible to avoid muting the other strings, to get a clear sound.

A Quick Guide To Uke Chord Charts
Before you get started learning the chords, you’ll need to understand how a ukulele chord chart works. Here are the four things you need to know to read a chord chart:
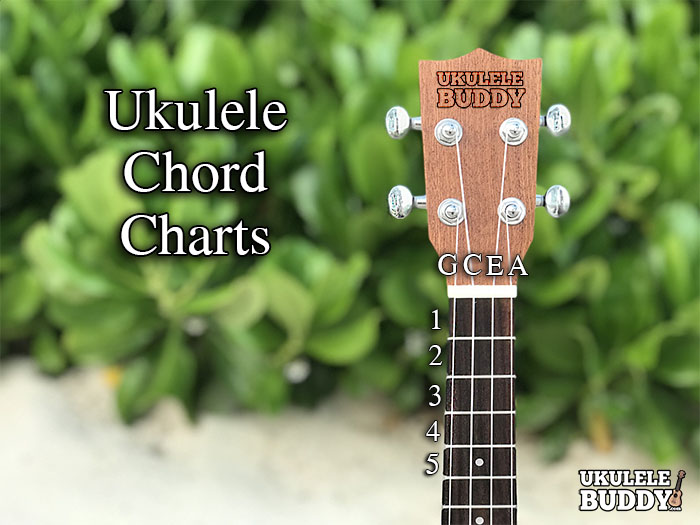
1. A chord chart is designed to illustrate the first five frets of a ukulele, with the vertical lines being the strings
and the horizontal lines being the frets. You can see these labeled on a real ukulele in the image above.
2. The four strings, from left to right, are G, C, E, and A, also shown above.
3. The solid circles you'll see in the images below represent where you position your fingers on the strings.
4. Also below, if you see an open circle at the top of the chart, then this represents an open string, so you don’t put
any fingers on this string.
And that’s it! Now, onto the chords...
C Major Ukulele Chord
The C major chord is super simple as it only requires one finger. Remember, that the open circles represent open strings, so no fingers are needed on the G, C, or E string. Place your third (ring) finger on the A string at the 3rd fret. Your hand should look similar to the photo below.

A Major Ukulele Chord
Once you’ve mastered the C major chord, give the A major chord a go, which uses two fingers. Place your first (index) finger on the 1st fret of the C string and your second (middle) finger on the 2nd fret of the G string. And that’s your A major chord!

A Minor Ukulele Chord
Now let’s try out the A minor chord, which is pretty similar to the A major chord, just one finger less. Place your first finger on the 2nd fret of the G string.

G Major Ukulele Chord
Next, we’ll take a look at the G major chord, which is a little trickier because it uses three fingers. Place your first finger on the 2nd fret of the C string, your second finger on the 2nd fret of the A string, and your third finger on the 3rd fret of the E string. This finger positioning might feel a bit uncomfortable at first, but the more you play, the more you’ll get used to it.

F Major Ukulele Chord
Let’s try out the F major chord. Place your first finger on the 1st fret of the E string, and your second finger on the 2nd fret of the G string. Done!

D Major Ukulele Chord
The D major chord uses three fingers all positioned on the 2nd fret. Place your first finger on the G string, your second finger on the C string, and your third finger on the E string.
This chord can feel crowded with 3 fingers on the same fret, especially for those playing a concert or soprano sized Ukulele. Feel free to experiment with different options, like a barre, which you will learn about below. As long as the G, C, and E strings are being pressed, and the A string is left open, do what feels best for you.

D Minor Ukulele Chord
The D minor chord is similar to the F major chord with an additional finger. Place your first finger on the 1st fret of the E string, your second finger on the 2nd fret of the G string, and your third finger on the 2nd fret of the C string.

E Minor Ukulele Chord
If you’ve mastered all the chords so far, E minor won’t be tricky at all. Place your first finger on the 2nd fret of the A string, your second finger on the 3rd fret of the E string, and your third finger on the 4th fret of the C string.
Tip: Remember to keep your fingers arched high to avoid fretting other strings.

B Major Ukulele Chord
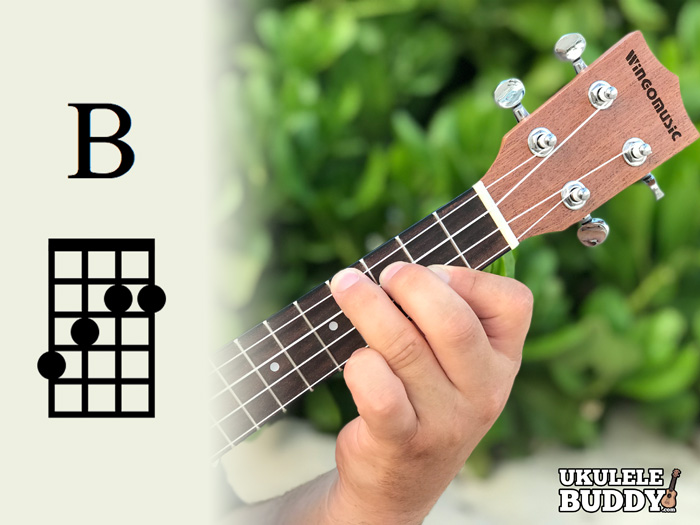
Now, we’re going to move onto some more challenging chords, starting with B major. A B major chord uses what’s called a barre chord. A barre chord is where you use one finger to hold down two or more strings at the same time. To play a B major chord, take your index finger and hold down the 2nd fret on both the E and A strings. Then place your second finger on the 3rd fret of the C string, and your third finger on the 4th fret of the G string.
Tip: When playing a barre chord, place your thumb on the back of the ukulele neck to help you apply more pressure.
This might take a bit of practice, but mastering the barre chord will help you with lots of different chords in the future!

Bb/A# (B flat/A sharp) Ukulele Chord
Once you’ve got the B major chord down, have a go at the B flat chord. Take your first finger and barre the E and A strings at the 1st fret, then place your second finger on the 2nd fret of the C string, and your third finger on the 3rd fret of the G string.

D7 Ukulele Chord
D7 is a 7th chord. Not sure what a 7th chord is? Well, 7th chords are a combo of a triad with the addition of another note. Let’s start with learning D7, which also uses a barre chord. Use your first finger to barre the G, C and E strings at the 2nd fret, then place your second finger on the 3rd fret of the A string. Again, this chord might take a bit of practice, but remember to take your time!
Alternative D7 Chord: Place your first finger on the 2nd fret of the G string. Your second (middle) finger also goes on the 2nd fret, but on the E string. The C and A strings should be left open.

G7 Ukulele Chord
G7 is bit simpler than D7. To play a G7 chord, place your first finger on the 1st fret of the E string, your second finger on the 2nd fret of the C string, and your third finger on the 2nd fret of the A string. And you’ve got it!

E7 Ukulele Chord
Finally, we’re going to end with an E7 chord. Place your first finger on the 1st fret of the G string, your second finger on the 2nd fret of the C string, and your third finger on the 2nd fret of the A string.
Tip: Remember to play with the tips of your fingers. Arching your fingers more can help avoid muting the E string.

TIP: Notice the similarities between chords like F and A and try to switch between chords with as little movement as possible.
By practicing these basic chords, you’ll be well equipped to start learning more complex chords and chord progressions, as well as using them to jam along to your favorite songs.
Remember to take your time and have fun!


